
Shopify allows you to create up to 3 products variant, such as Size, Color and Material for any given product. In addition, Shopify assumes that any combination of those options is a variation. This can easily cause problems for merchants who have a lot of customization options, since Shopify also has a maximum number of variants (100). So, if you are a Merchant on Shopify and you're looking for a way to expand that limit to offer more options to your customers and you're not particularly keen on spending 10$-50$+ per month on an app, keep reading because I'll show you just how to do it yourself completely free!
IMPORTANT
There are some limitations with line item properties. Unlike product variants, you cannot track inventory or change the product's price with your additional custom fields. If you choose to make a bundle box and enable your customers to choose multiple products to populate that bundle, you must be confident that you will not face any shortage of inventory as you might oversell your available quantities without having any safeguard from Shopify. The options selected by the customer will not affect the price in any way.
You can use this solution to make bundles, customize a product and more!
Step 1: Create a New Product Template
First thing's first, you will need to create a new product template to apply those options only to the products you want.
To create a new product page template:
- From your Shopify Admin, go to Online Store > Themes
- Find the theme you want to edit, and then click Actions > Edit code.
- In the Templates directory, click Add a new template.
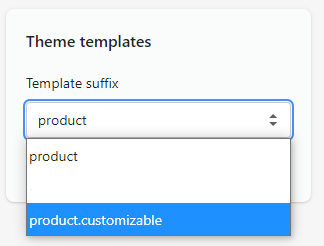
- Choose product from the drop-down menu, and name the template as you wish (but remember this will be the name of the template you'll apply to your products, so be sure to use a descriptive one so you can remember which template does what when you have more templates in the future.) For the sake of this tutorial, we will name ours "customizable".
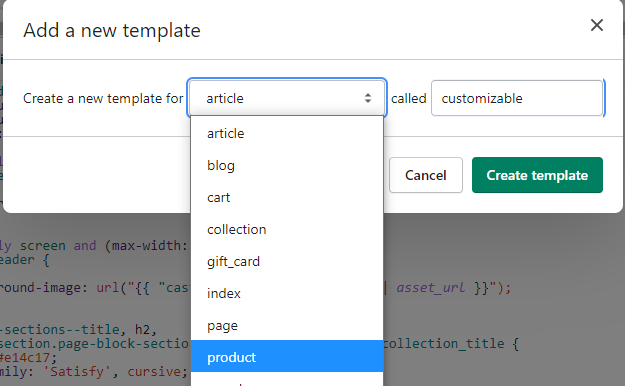
- Click create template. This creates a copy of your product.liquid template called product.customizable.liquid. The new file will open in the code editor.
- Then you have two options available for you. You can decide to create a completely new section for your template by copying the code from your current product.template and make the changes in that new section. In that case, make sure to replace 'product-template' from {% section 'product-template' %} to the name of the section you created. The other option possible is a bit more simplistic, you can use the current product.template and add a condition of visibility. We will go for the second option for this tutorial but keep in mind it would be best practice to go with the first option since it can get crowdy really quick once you start to create more and more templates. If you only have one product you want to add customization option to then the second option will do the trick.
Step 2: Creating your Customization Options
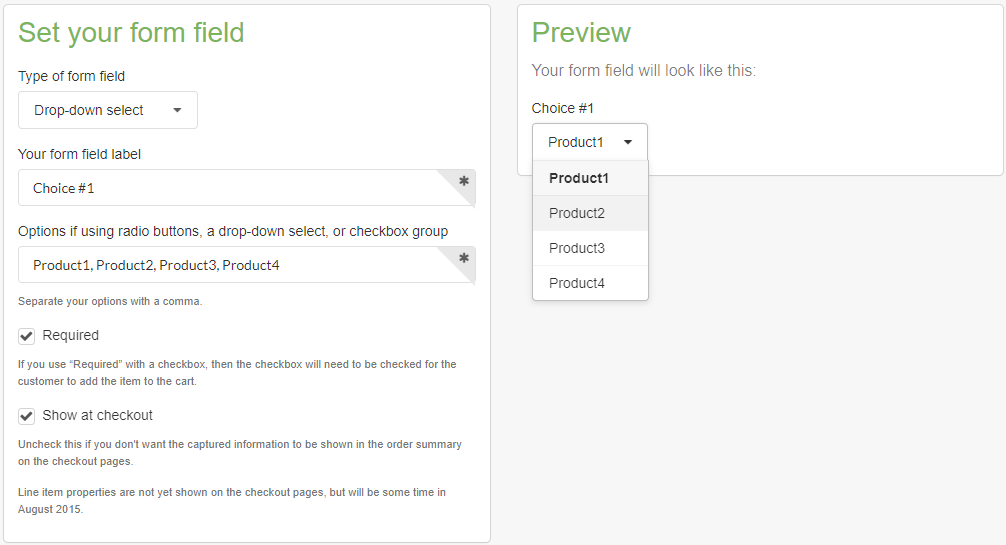
You can add as many custom form fields to your product page as you need. You can use the Shopify UI Elements Generator tool to easily generate the HTML and Liquid code for each form field that you want to add to your cart page. This tool was created by Shopify to help simplify the process of adding custom user interface elements, such as form fields and icons, to Shopify themes.
- Go to the Shopify UI Elements Generator tool
- In the Set your form field section, select the type of form element that you want to use from the Type of form field drop-down menu
- If you want your theme to prevent customers from adding a product to the cart before they have filled in your form field, check Required.
- You can see a preview of your form field in the Preview section
5. Copy the generated code from the box in the Grab your code section:
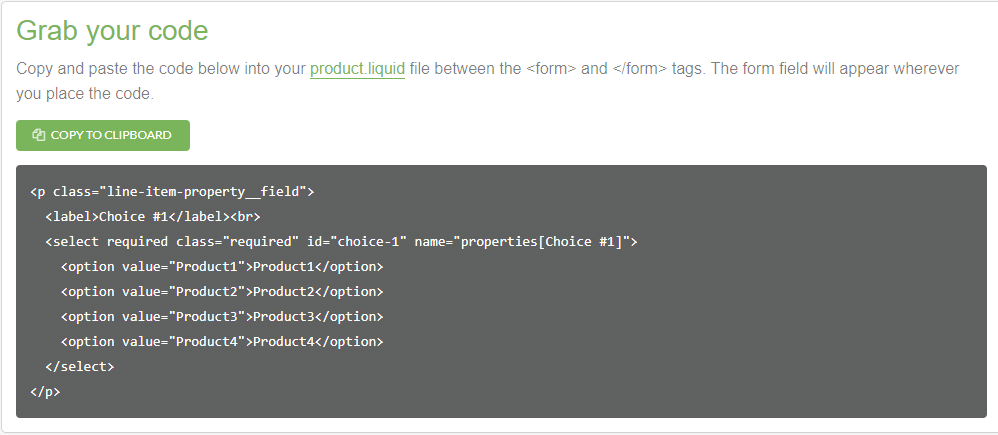
You can edit the text inside the [] of the properties array 'properties[Choice #1]' the text inside, here 'Choice #1' will be displayed as the title for the customization. So make sure it is descriptive enough so you know what it is when you receive an order, and for the client to make sure his choices have been correctly registered. The customer will see the line items in the cart, checkout and receipt.
Step 3: Adding the Code to the Product Template
To add custom form fields to your template:
- From your Shopify Admin, go to Online Store > Themes.
- Find the theme you want to edit, and then click Actions > Edit code.
- In the Sections directory, click product-template.liquid if you chose option #2 in section 1.6 or the product template section you created if you went with option #1.
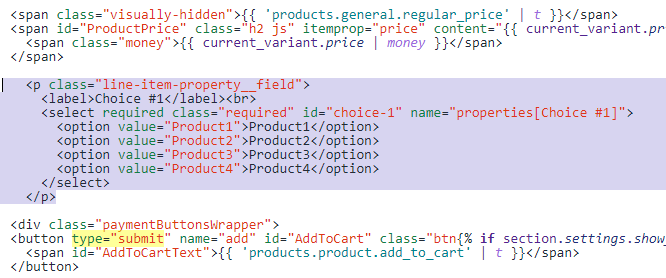
- Hit CTRL + F and search for type="submit". If the search doesn't return anything try looking for something that looks like that: {% form 'product', product, id: "AddToCartForm" %}. This is part of the code for the Add to cart button.
- For those who chose option #1 in section 1.6. On a new line above the block of code that contains the Add to cart button, paste the form fields for your product customization that we copied at step 2:
- For those who chose option #2 in section 1.6. Do the same thing we did in the last step but add {% if template contains 'customizable' %} before your code and {% endif %} on a new line after your pasted code:
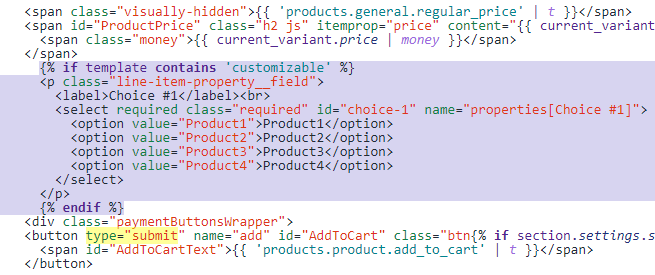
- The line where you place the code determines where the form field will appear on your product page. You can experiment with putting the code in different places in the file between {% form 'product', product, id: "AddToCartForm" %} and type="submit". If you paste it outside of those lines your selector might still show but it will not register the data selected by your customers.
- Click Save
Step 4: Apply your New Template to a Product
To apply a template to a product:
- From your Shopify admin, go to Products > All product.
- Click the name of the product that will use your new template.
- In the Theme templates section, choose the template you have created in earlier steps from the Product template menu.
- Click Save
Step 5: Test and Review
Now that you have added line items properties to your products, we need to test your website to see if customers selection will be correctly registered.
- Go on the product page you applied your custom template to.
- Confirm that your customization options are correctly displayed. You can add some lines of css to your theme css files to correct some styling issues.
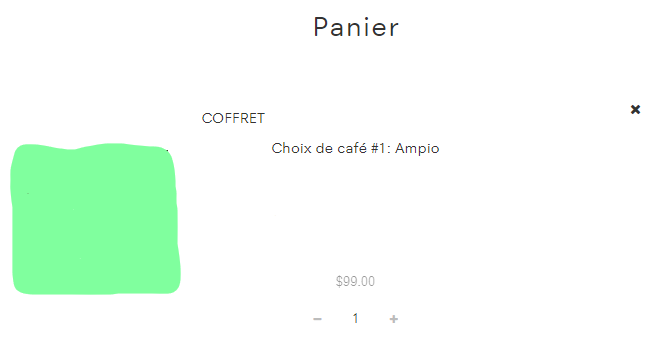
- Customize your product and add it to your cart.
- You should see your customizations in the cart and in the checkout.
In conclusion, we have seen how to add unlimited variant options with line item properties. Line item properties can be very useful to offer a more personalized touch to your products, making bundle deals and much more! Line item properties should be considered before opting for a costly Shopify app.
If you struggle to make it work with your shop or if you would feel more comfortable to have a trained professional edit your code, feel free to reach out and we'll be happy to help!
See you in the next article!

